Up to date
This page is up to date for Blazium 0.4.90 (4.3).
If you still find outdated information, please open an issue.
Visual Studio
Visual Studio Community is a Windows-only IDE by Microsoft that's free for individual use or non-commercial use within organizations. It has many useful features, such as memory view, performance view, source control and more.
Importing the project
Visual Studio requires a solution file to work on a project. While Godot does not come with the solution file, it can be generated using SCons.
Navigate to the Godot root folder and open a Command Prompt or PowerShell window.
- Run
scons platform=windows vsproj=yes dev_build=yesto generate the solution with debug symbols.Thevsprojparameter signals that you want Visual Studio solution generated.Thedev_buildparameter makes sure the debug symbols are included, allowing to e.g. step through code using breakpoints. You can now open the project by double-clicking on the
blazium.slnin the project root or by using the Open a project or solution option inside of the Visual Studio.Use the Build top menu to build the project.
Warning
Visual Studio must be configured with the C++ package. It can be selected in the installer:

Debugging the project
Visual Studio features a powerful debugger. This allows the user to examine Godot's source code, stop at specific points in the code, inspect the current execution context, and make live changes to the codebase.
You can launch the project with the debugger attached using the Debug > Start Debugging option from the top menu. However, unless you want to debug the Project Manager specifically, you'd need to configure debugging options first. This is due to the fact that when the Godot Project Manager opens a project, the initial process is terminated and the debugger gets detached.
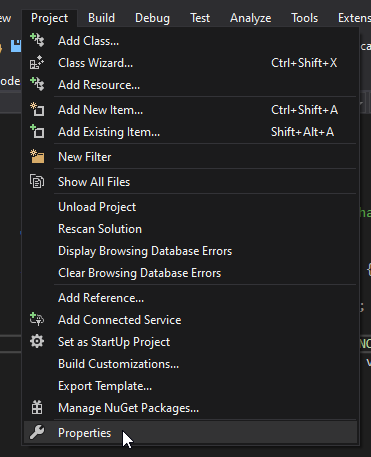
To configure the launch options to use with the debugger use Project > Properties from the top menu:

Open the Debugging section and under Command Arguments add two new arguments: the
-eflag opens the editor instead of the Project Manager, and the--pathargument tells the executable to open the specified project (must be provided as an absolute path to the project root, not theproject.godotfile; if the path contains spaces be sure to pass it inside double quotation marks).

To learn more about command line arguments, refer to the command line tutorial.
Even if you start the project without a debugger attached it can still be connected to the running process using Debug > Attach to Process... menu.
To check that everything is working, put a breakpoint in main.cpp and press F5 to
start debugging.

If you run into any issues, ask for help in Blazium's official Discord server.